In the GuardianKey’s administration panel you can set-up preferences for the detection engine and visualize your risks, events, and user’s interaction behaviours.
In this page we provide a brief documentation about our panel.
Images can be enlarged by clicking on them.
Contents
Accessing for the first time
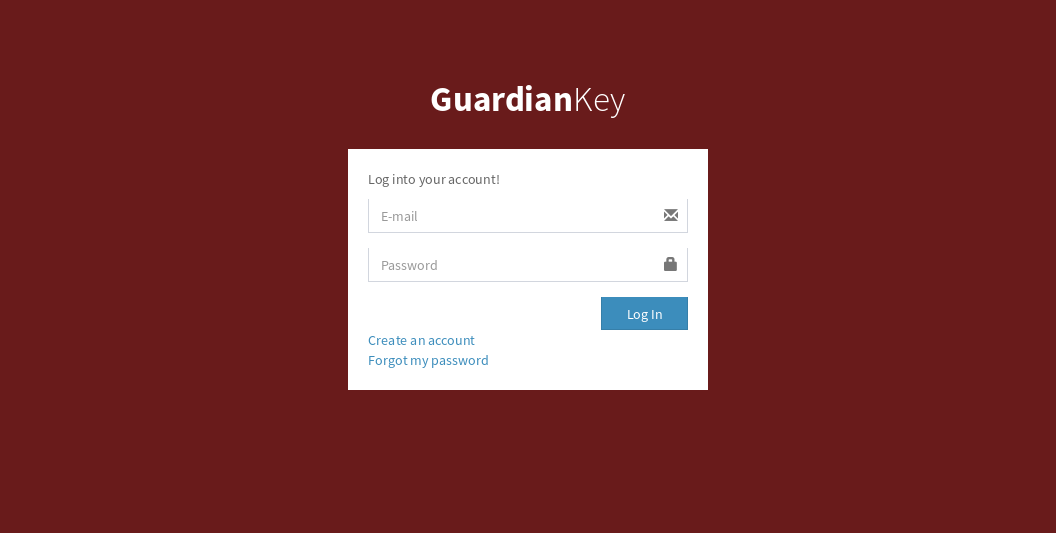 The administration panel can be accessed via Web, at the following URL:
We note that we also have an in company version. In this case, the panel would be hosted in your environment.
You can use your account login data if you already have, or create a new account. If you are using a plugin, it may have created an account for you via API.
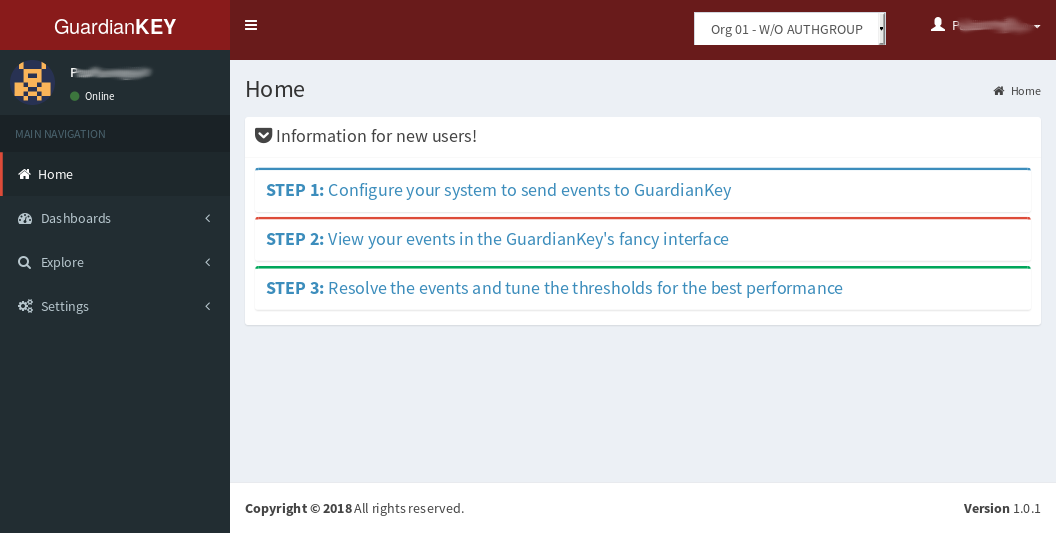 The panel’s interface is easy and intuitive.
The main menu is divided into
the following functional parts:
The panel’s interface is easy and intuitive.
The main menu is divided into
the following functional parts:
- Dashboards: it is possible to have an overview oriented to risks, events or geographic.
- Explore: you can search and explore events and users.
- Settings: you can create organizations, authentication groups and policies, to be used by the detection engine.
Clicking on usernames, it is possible to view details about it.
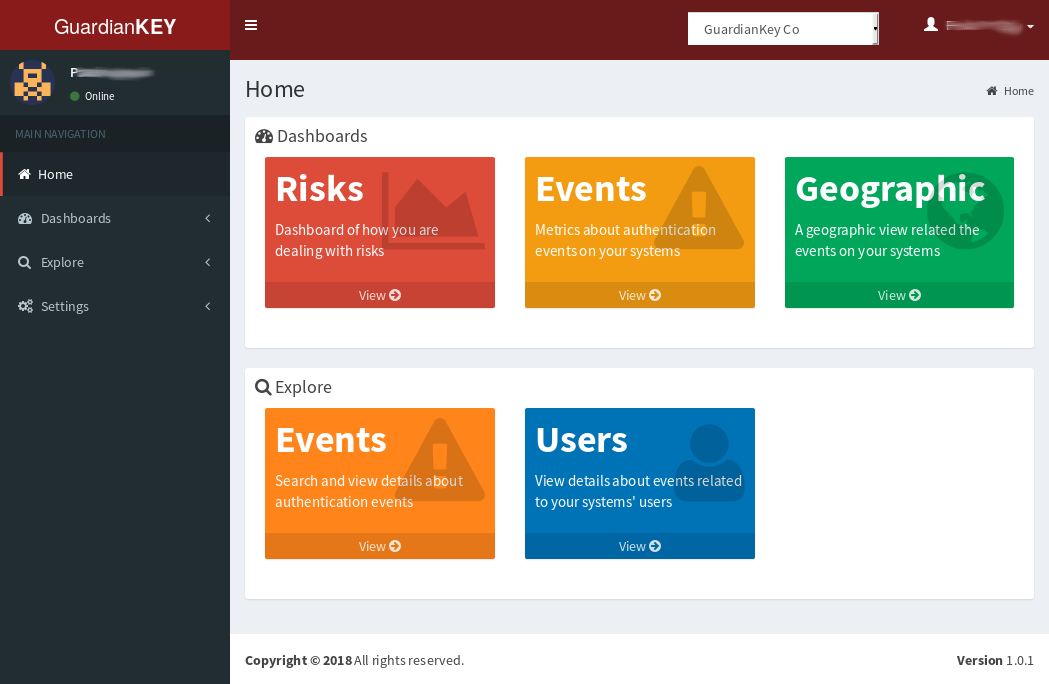 If you still don’t have events collected, you should see some instructions
to make GuardianKey run in the first page, after login (last screenshot).
Otherwise, you will see some links to view your data (screenshot at right).
If you still don’t have events collected, you should see some instructions
to make GuardianKey run in the first page, after login (last screenshot).
Otherwise, you will see some links to view your data (screenshot at right).
Below we provide details about the mentioned features.
Creating a new account
An account for you should be automatically created via API if you have used a plugin provided by us. In this case, you should have received an e-mail with the access details.
If you have not installed any plugin, you have to create an account and then configure your systems to send events to the GuardianKey’s servers.
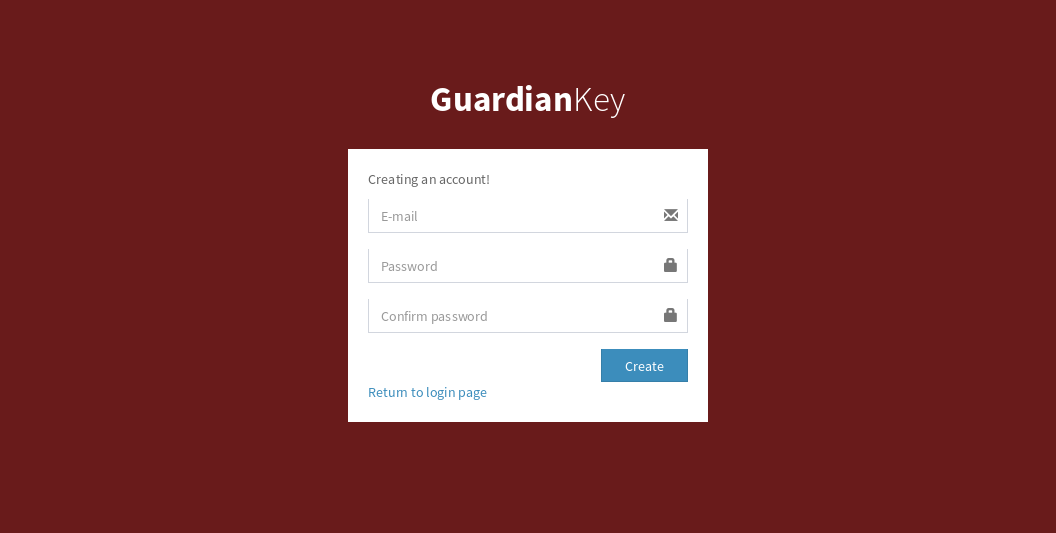 In this case, access the registering form at
https://panel.guardiankey.io/auth/register
and follow the instructions.
In this case, access the registering form at
https://panel.guardiankey.io/auth/register
and follow the instructions.
Recovering the password
To recover the password of an account at the GuardianKey’s panel, you should access the link https://panel.guardiankey.io/auth/forgotpass , type your e-mail address and follow the instructions that should be sent via e-mail.
NOTE: The recovery e-mail can be considered as SPAM, thus, have a look at your spam folder. The servers maintained by Microsoft (Outlook, Hotmail, MSN, Live, etc.) usually drops the e-mail without sending it to a spam folder. If it is your case, you have to include our e-mail “[email protected]” in the safe sender list, at the configuration menu of your e-mail service. In the external URL below, you can find the steps for these procedures.
Basic concepts
GuardiaKey processes the authentication events sent by your systems to our engine to detect malicious activities and protect your systems against attacks.
One account at our panel can administrate many “organizations” and many “policies”. An “organization” can have many authentication groups “authgroups”.
- Organization: may have many authgroups and policies.
- Authgroup: is, basically, a set of users submitted to a policy and a response preference. One user is unique in an authgroup.
- Policy: basically, is risk thresholds to define what to do based on the risk levels.
GuardianKey is risk-oriented. This feature provides a realistic view about the relevance of events in your systems. Also, it enables you to couple the risk outputs in the organization’s risk framework.
GuardianKey computes a risk for each event and recommends to your system a response, based on the thresholds set-up in the policy. There are the following responses:
- Accept: risk too low, just allow the access and log.
- Notify: allow the user action and notify the user about the access (e.g., via e-mail).
- Hard notify: requires an extra action for the user to allow the access. For example, requiring the use of a second authentication factor. The user will also be notified for this access.
- Block: block the user action and do not notify the user. This should be use only for high risks.
Events may have the following states:
- Pending: it was notified to the user and it is needed an action from the user to mark it as resolved.
- Resolved: the event was accepted, blocked or resolved by the user (via e-mail) or administrator (via panel).
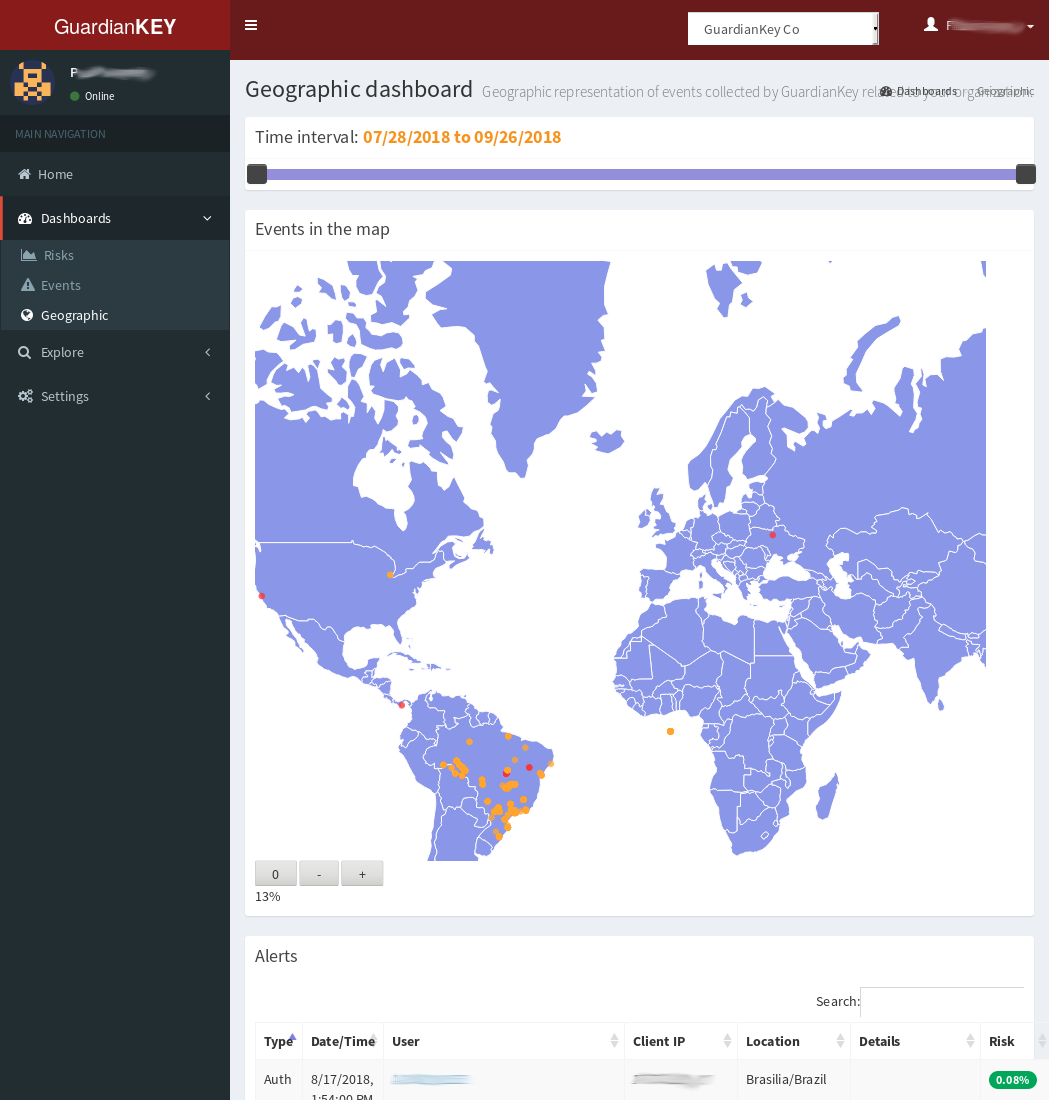
Dashboards
The GuardianKey’s administration panel, currently, provides the following dashboards:
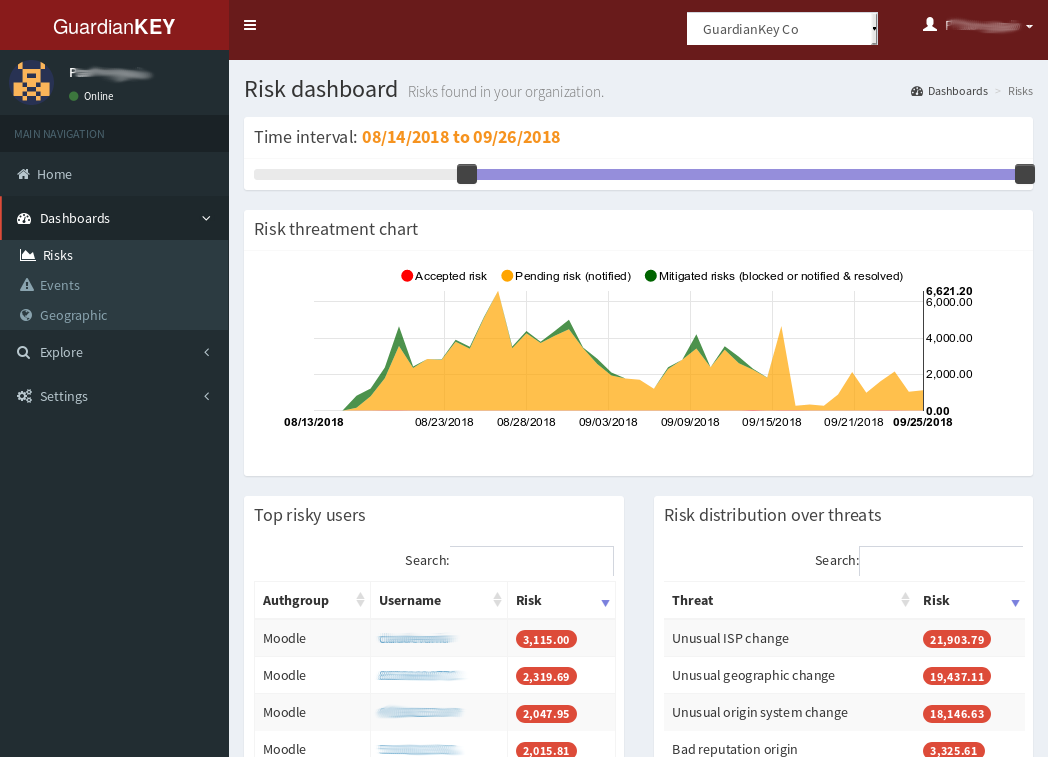
- Risk: provides information about the accepted, mitigated, and pending risk.
The accept risk is the sum of all events below the “accept”
threshold. Mitigated risk is the risk related to the blocked events
and threated events. The pending risk is the sum of event risks
of the notified events.
- Event: provides information about the number of events, based on each response type.
- Geographic: provides the events ploted in the world map.
On all dashboards, you can choose the time period to create the graphs and tables.
Currently, it is not possible to create customized dashboards. However, you can send the processed events to your analytics application (e.g., a SIEM), and visualize the data integrated to other logs of your organization. This can be done by setting-up Web hooks.
Exploring events and users
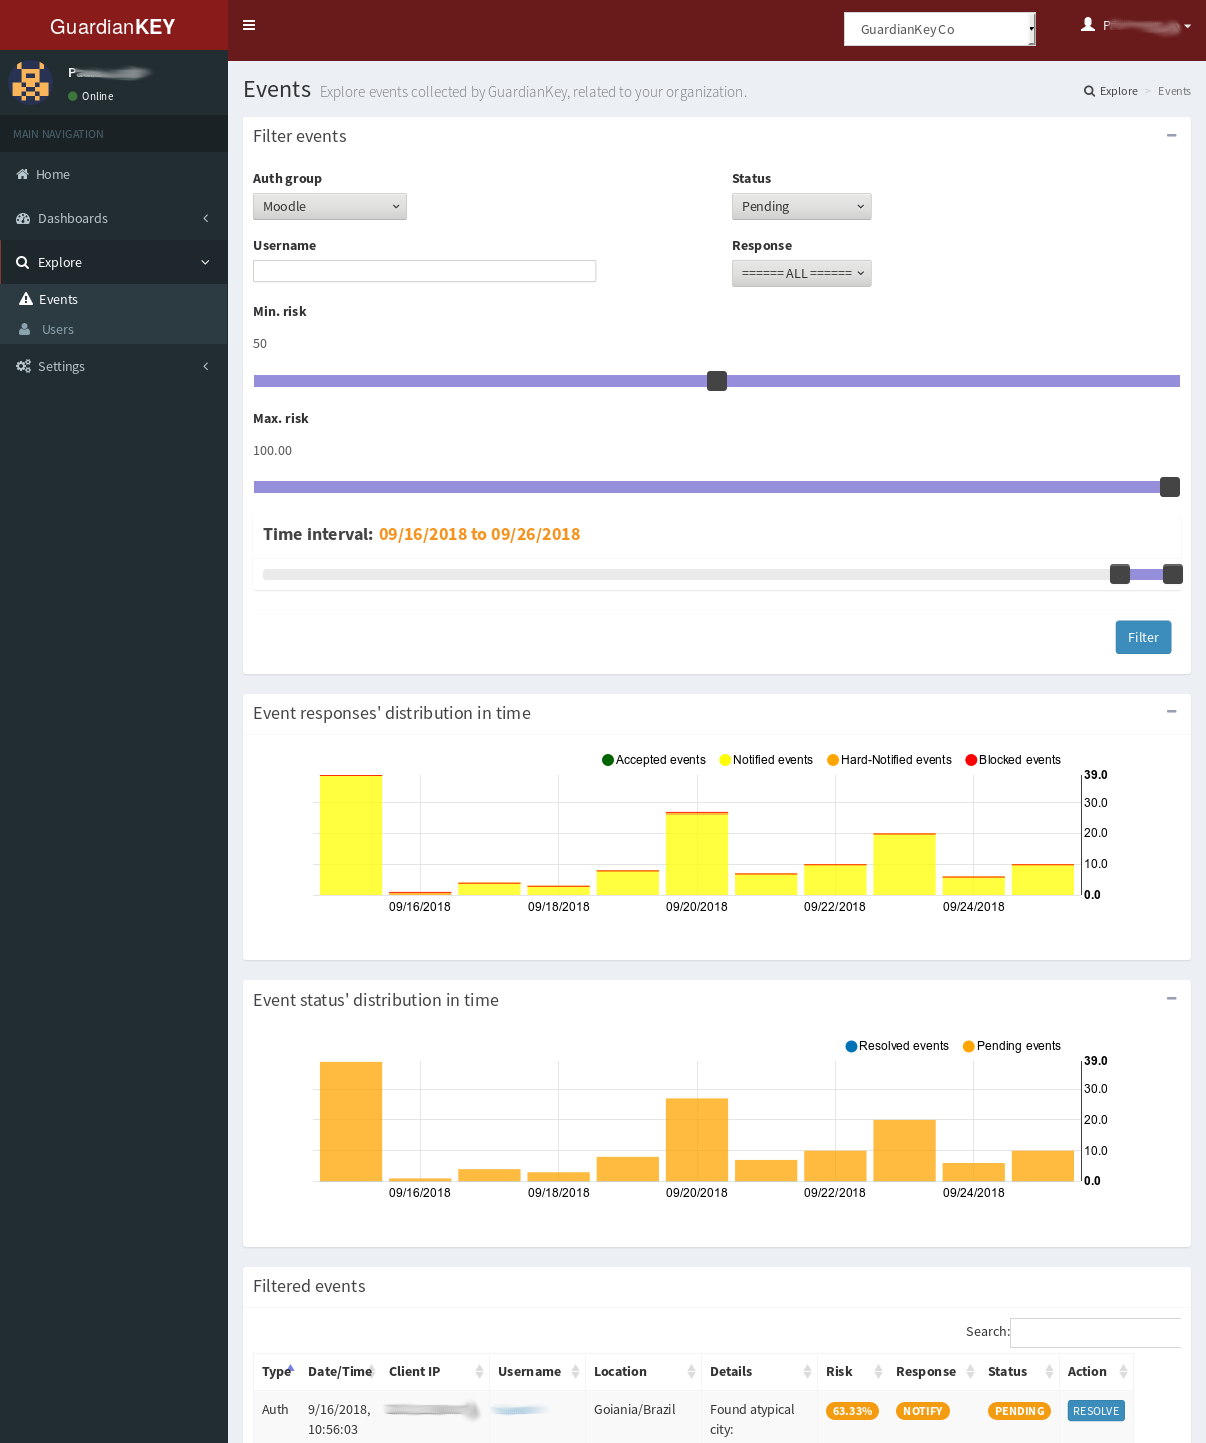 In the menu “Explore” it is possible to search and explore
users and events. Just set the search options in the search form
and click on the “Filter” button.
In the menu “Explore” it is possible to search and explore
users and events. Just set the search options in the search form
and click on the “Filter” button.
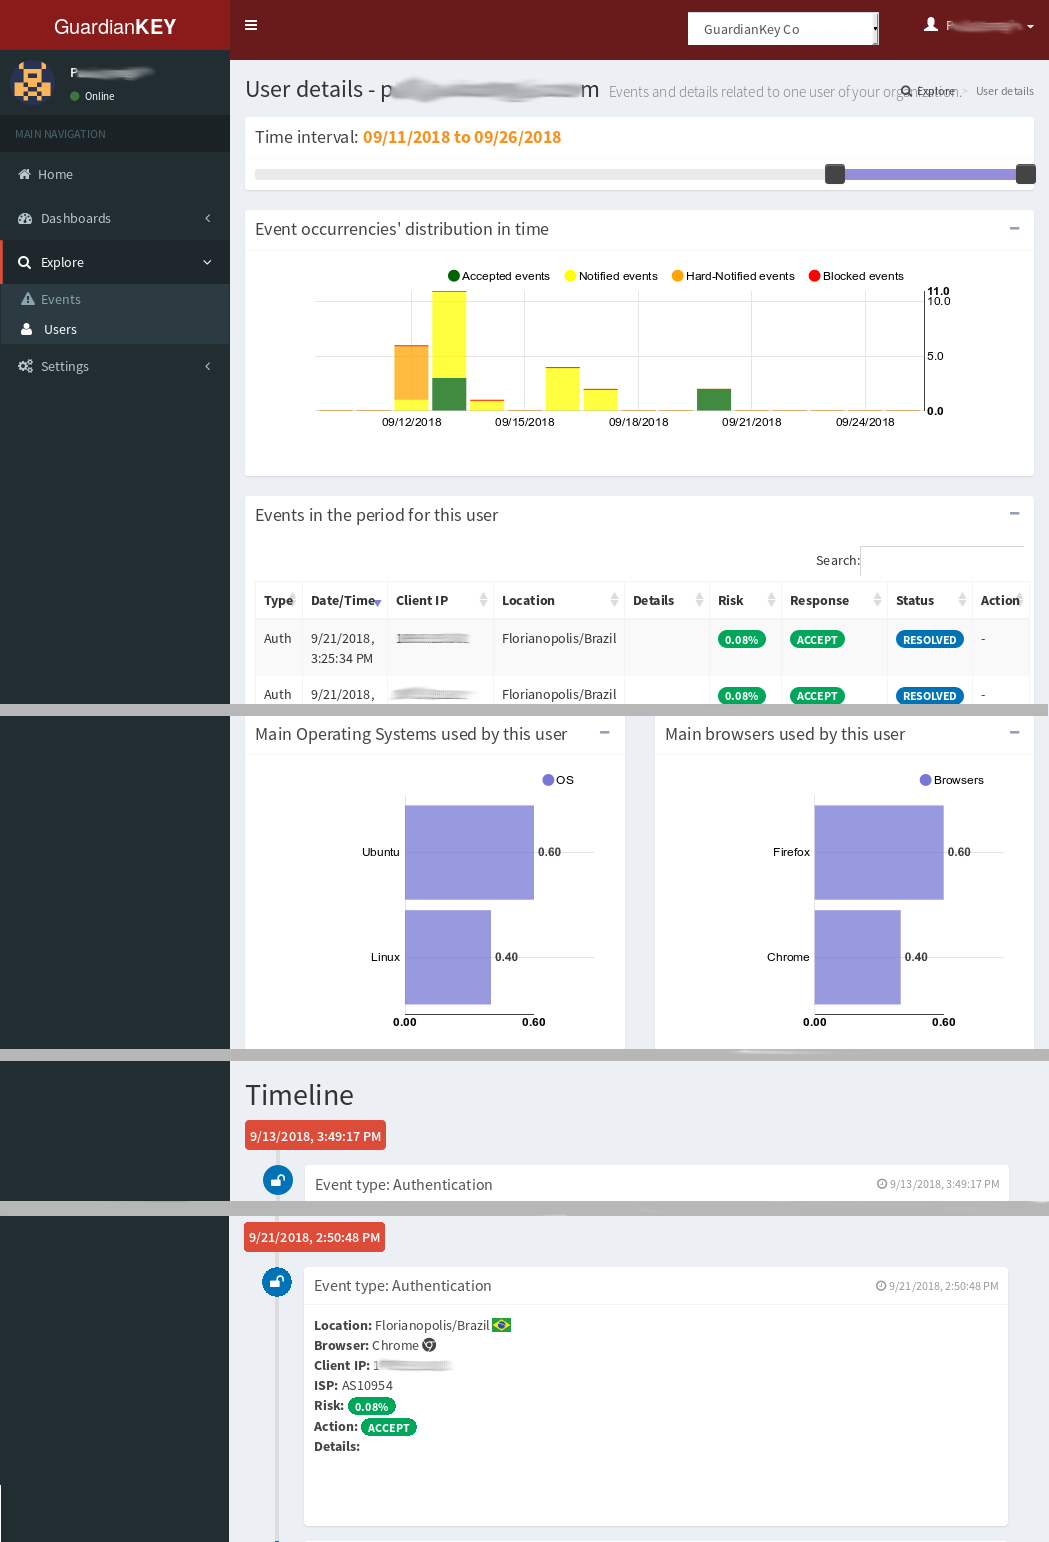 In any place of the panel, you can click in the username
to open details about the specific user.
In this page, there are the events and custom behaviors
of the related user.
In any place of the panel, you can click in the username
to open details about the specific user.
In this page, there are the events and custom behaviors
of the related user.
Changing password and profile settings
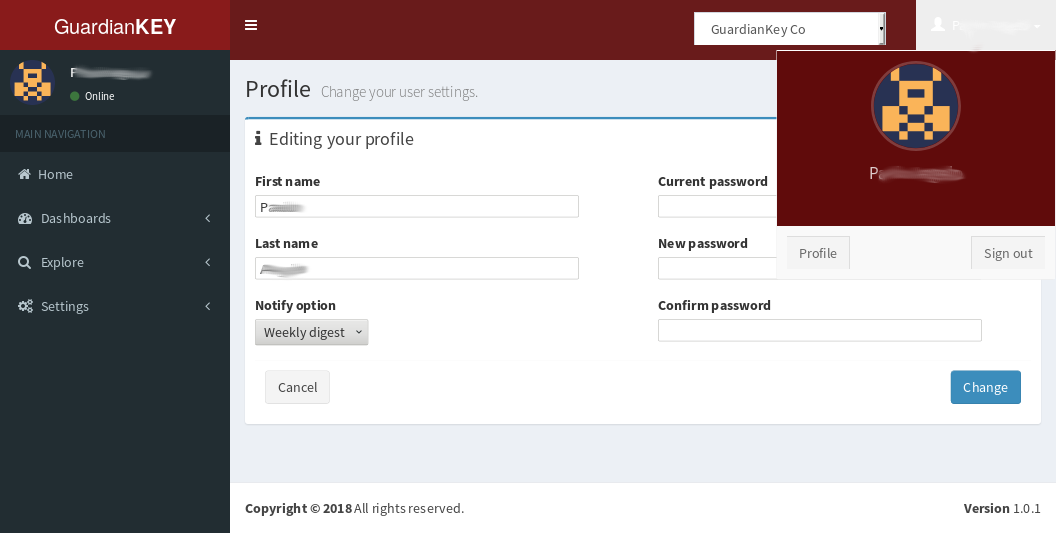 To change the settings for the account in the
administration panel, you just have to click over the
username at the top-right and, then, profile.
To change the settings for the account in the
administration panel, you just have to click over the
username at the top-right and, then, profile.
Engine settings
In the panel you can also change detection preferences. Below, we present how.
Organizations
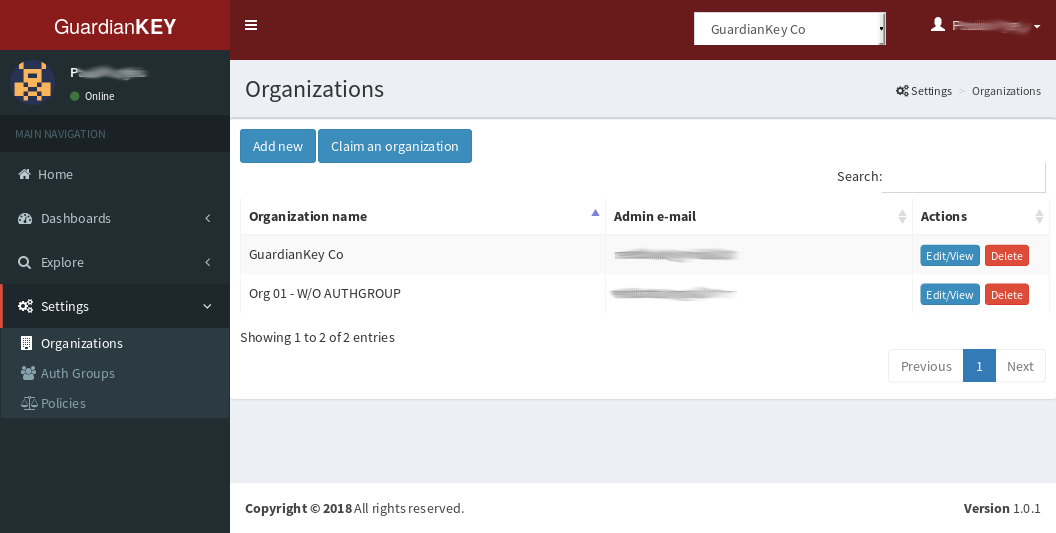 You can view, edit, delete, create new, and claim authority over organizations.
“Claim an organization” is used to give to your user the administration access over an organization, including its policies and authgroups.
This may be needed if you already have an organization created and want to have access over it using another account. It will not revoke the access of the last user, just include access for the new one.
Policies
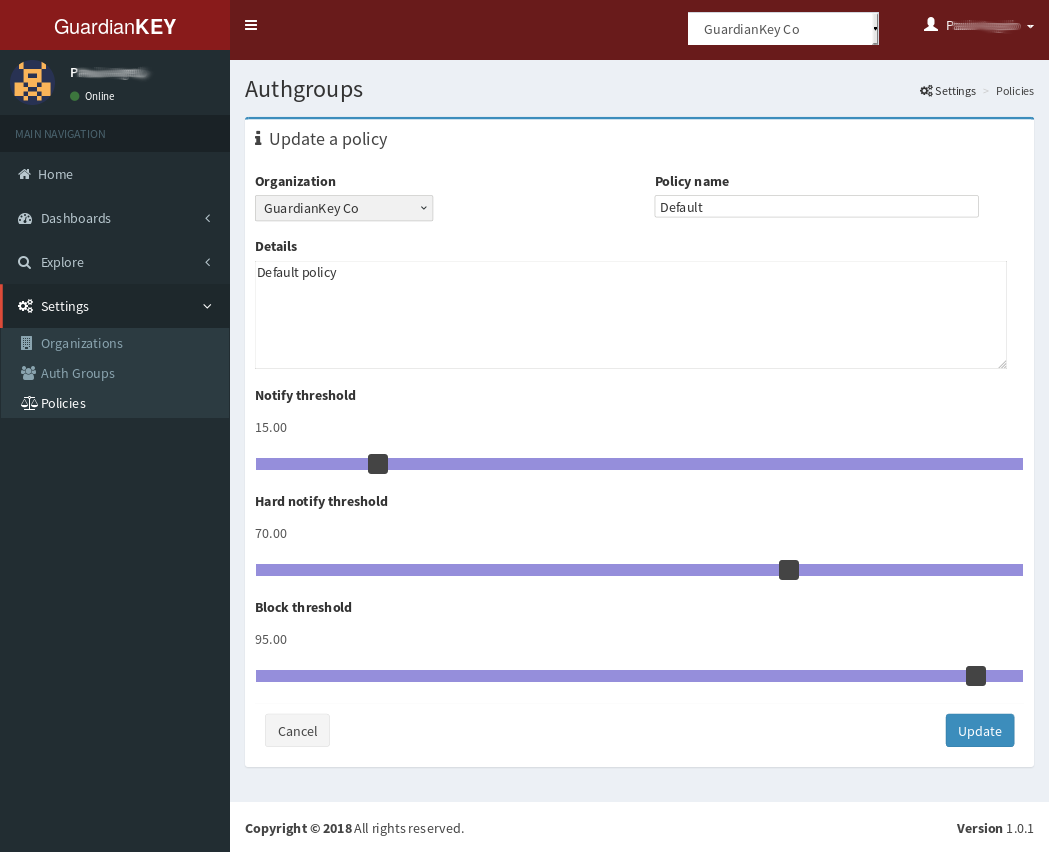 On defining a policy, you should set three thresholds:
- “Notify threshold”: events will be accepted below it and notified above it.
- “Hard notify threshold”: for events with risk above this value, it will be suggested to the system to require more actions from the user (e.g., an extra authentication factor).
- “Block threshold”: over this threshold, the user action will be blocked. User will not be notified about this via e-mail.
Authgroups
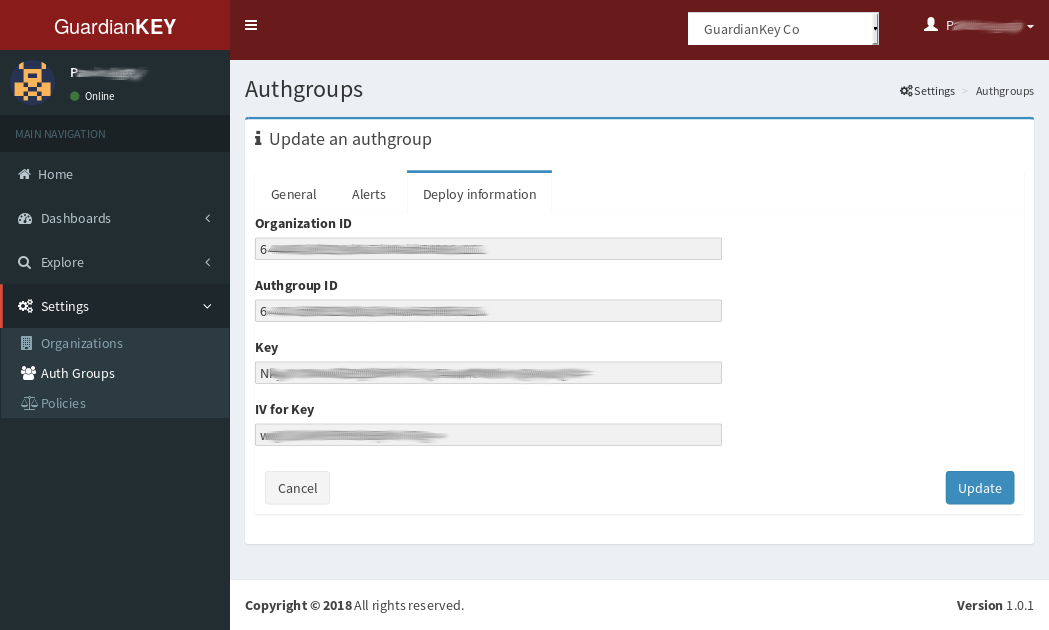 An authgroup is, maybe, the most important entity in your configuration.
The events should be sent to an authgroup.
Some information is required to configure your systems to send
events to GuardianKey, basically: KEY, IV, organizationID, and the authgroupID.
These information can be found in the “Deploy information” tab.
An authgroup is, maybe, the most important entity in your configuration.
The events should be sent to an authgroup.
Some information is required to configure your systems to send
events to GuardianKey, basically: KEY, IV, organizationID, and the authgroupID.
These information can be found in the “Deploy information” tab.
 Users are unique in an authgroup. Also, here, you should set-up the policy and the notification options.
The name and description of an authgroup is used just for your reference.
Users are unique in an authgroup. Also, here, you should set-up the policy and the notification options.
The name and description of an authgroup is used just for your reference.
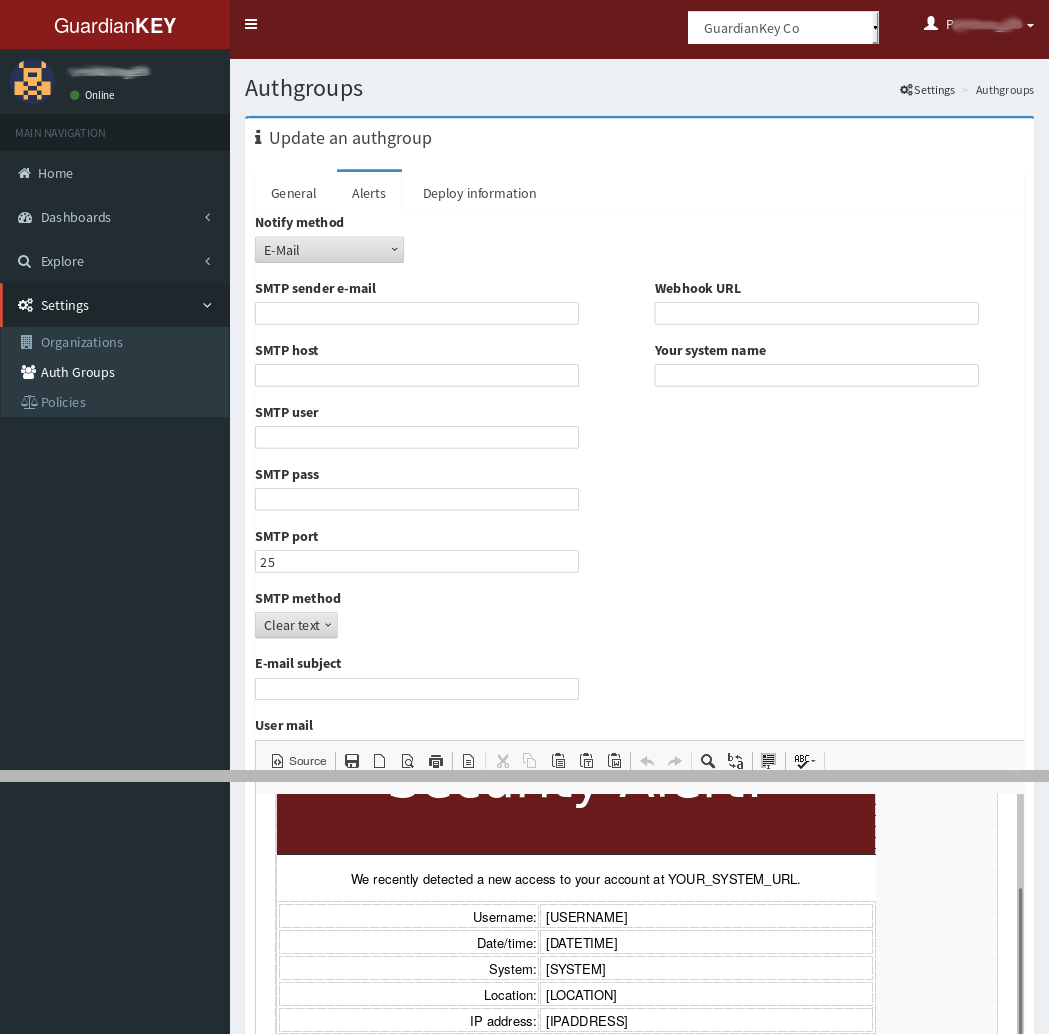 In the tab “Alerts”, you must set-up how your users should be notified
if the event risk level is in a notifiable risk level.
GuardianKey supports the following options:
In the tab “Alerts”, you must set-up how your users should be notified
if the event risk level is in a notifiable risk level.
GuardianKey supports the following options:
- E-mail via your SMTP: used to send event notifications to your users via a mailing server provided by you. You can use a GMail account, for example.
- Web hook: in this case, GuardianKey will process the events to compute its risk and submit them via REST using the “Web hook URL”, inputed by you in the form. This is particular useful to collect the events in your log system. The response should be made in your side. There is examples in our GitHub to implement webhook service in your web application server. Some plugins already implements a Web hook to receive and deal with the processed events.
Below we provide more details about each notification case.
Set-up to send e-mails to my users
Based on your settings, GuardianKey can notify your users via e-mail about risky access on their accounts at your systems.
In this case, you must provide a SMTP server for such e-mails. To avoid troubles with spam filters, we do not send e-mails directly.
There are many options to solve this, such as:
- You can allow our server’s IP to make relays in your SMTP server and input the IP address of your SMTP relay server;
- If all users’ e-mails have the same domain name, you can just inform the MX of this domain.
- You can create an account at a free mailing service, such as GMail, and input the account data in GuardianKey;
If you choose options 1 or 2, you should input on editing your authgroup:
- Notify method: E-mail
- SMTP Host: your SMT relay server IP or the MX’s IP
- Port: 25
- SMTP method: clear
If you choose 3, you can create an account in GMmail (for example), exclusive for this purpose, and set:
- Notify method: E-mail
- SMTP sender: the GMail address
- SMTP host: smtp.gmail.com
- SMTP user: the GMail address
- SMTP pass: the password
- SMTP port: 465
- SMTP method: SSL
NOTE: You may need to keep a password of an e-mail account in our systems, thus, do not use your personal account! Create an account exclusive for this purpose, without any other use.
In any case, you can customize the e-mail to be sent to your users in the authgroup’s edition form.
Set-up to send processed events to me, via Web hook
Based on your settings, GuardianKey can send the processed events to your systems via REST (webhook). In your systems, you can notify your users, make logs, and perform some data analytics on the events.
In this case, you must implement and host a webservice (REST) and input the URL in the authgroup’s form.
Some plugins provided by us already implement a webservice. You can also have a look at our GitHub to see an example code, at https://github.com/guardiankey/guardiankey-api-php .
- Notify method: Web hook
- Web hook URL: the URL
In any case, you can customize the e-mail to be sent to your users in the authgroup’s edition form.